Creating an Order in the Admin
Overview
Admin Users (Staff Accounts) can place orders on behalf of customers.

Zoey Admins can override restrictions by defaultPlease check your Team > Roles & Permissions to add restrictions for overriding out of stock, disabled or restricted products and pricing. Addition settings may be found in Orders > Settings > Admin Create Orders.
How To Create An Order
Step 1 - Click Create New Order
From the left-navigation or using the button in the top-right corner of your Order List page, click to begin creating a new order
Step 2 - Select/Create a Customer (or Continue as Guest)
The first screen you will see allows you to select an existing customer, create a new customer, or continue to create a guest order where a customer account is not required.
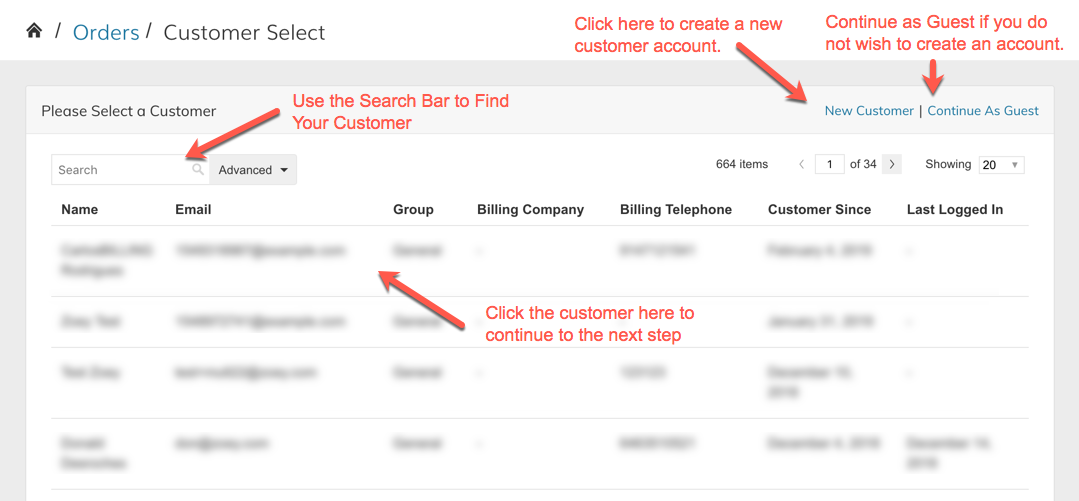
Continue As GuestContinue As Guest will not require an email address, only a customer group. If no email address is entered, the email will only be sent to the New Order Email BCC List specified in Settings > Emails. After clicking Continue As Guest you will have the option to select an existing customer or create customer if needed. After placing the order, it can later be assigned to a customer account by clicking "Change Customer" on the View Order screen.
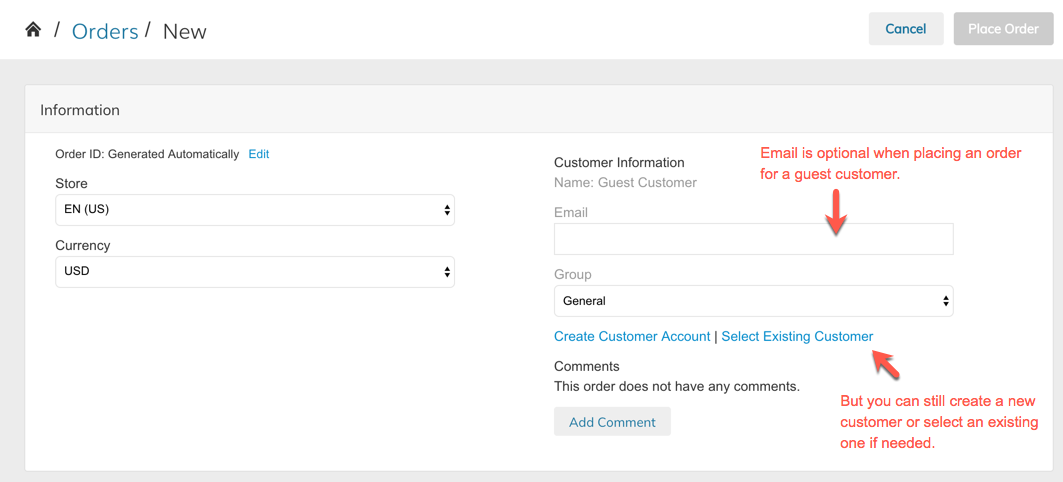
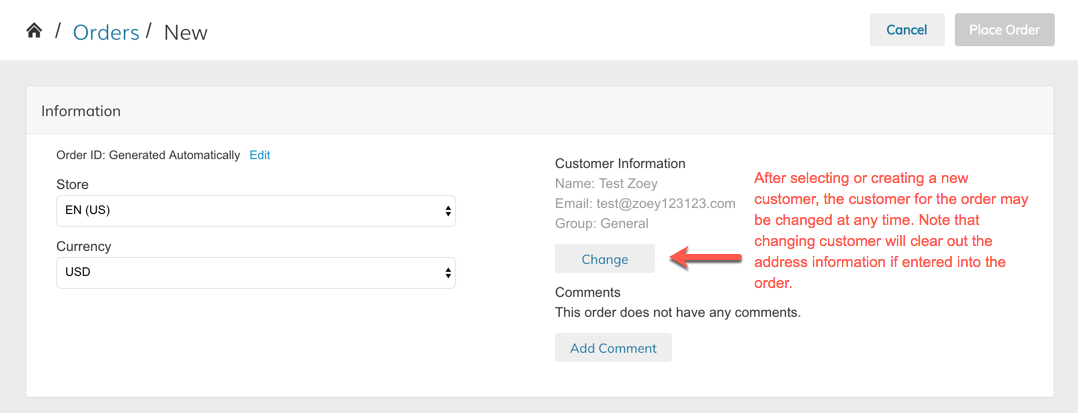
Selected or Created customer can be changed at any time during the order creation process
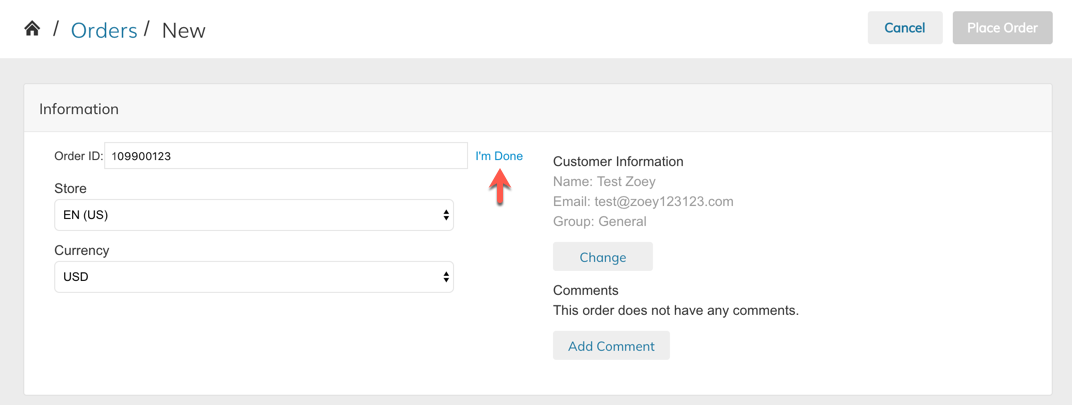
OPTIONAL STEP - Set Order ID, Language, and Currency
In the Information Section of the Order Create screen, you can specify a Language (Store) or Currency for the order. You can also set a custom Order ID by clicking Edit next to where it says "Generated Automatically".
Custom Order IDThe Custom Order ID will always begin with a number that references the Language selected. For your default language, the order will begin with a "1". For other languages: 2, 3, 4 etc...
The Custom Order ID field is Numeric Only (0-9) and must be a minimum of 9 numbers. You also may not use an order number that has previously been used.
Step 3 - Add Items
Use the Items section to search for and add products to the order. This section gives you access to quickly find products in the customer's cart, wishlist, and items they recently ordered. You can also search for all products, search using advanced filters or even quick-add by copy/pasting comma-separated values of SKU and Quantity.

Items Section
Clicking Add Products will open a "drawer" that can be used to search, select, configure and bulk-add products to the order. When you are finished adding products, click "Done" in the bottom right corner, the "X" in the top right corner, or just click back onto the left side of your screen to close the drawer.
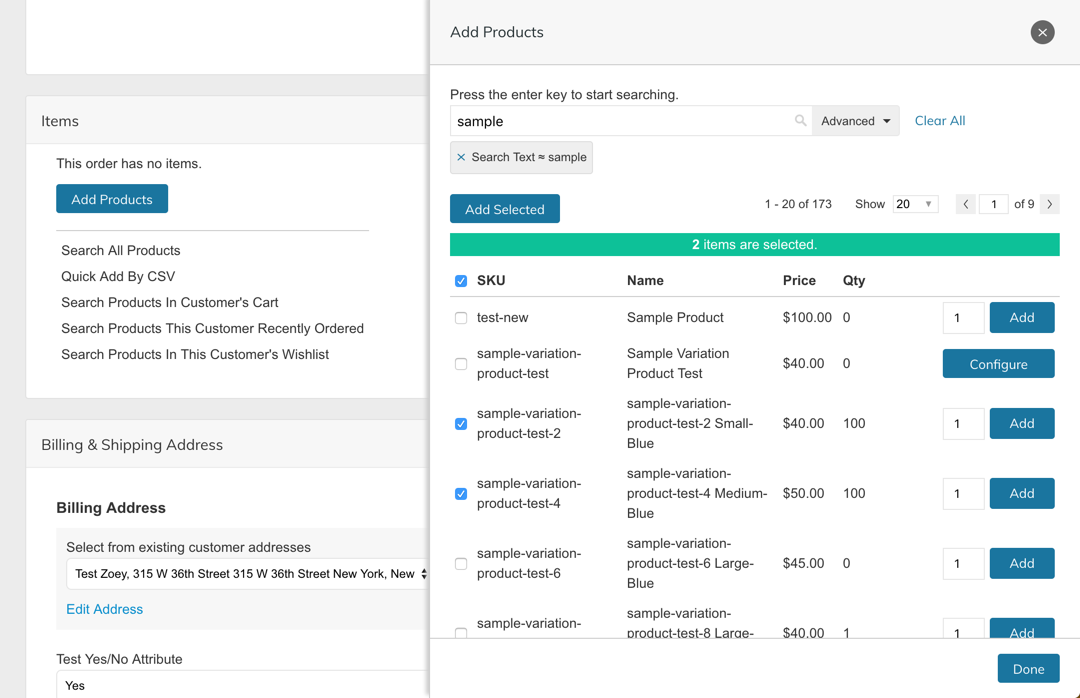
Add Products Drawer
Step 4 - Edit/Manage Items
Once Products are added to your order, you can now manage or edit them. Apply custom prices, edit the configuration, update the quantity or even remove items from any discounts applied from promotion rules. There is a search bar to quickly find the product you wish to edit. And there is an Add Products link in the top-right corner of the Items section that will open the Add Products drawer.
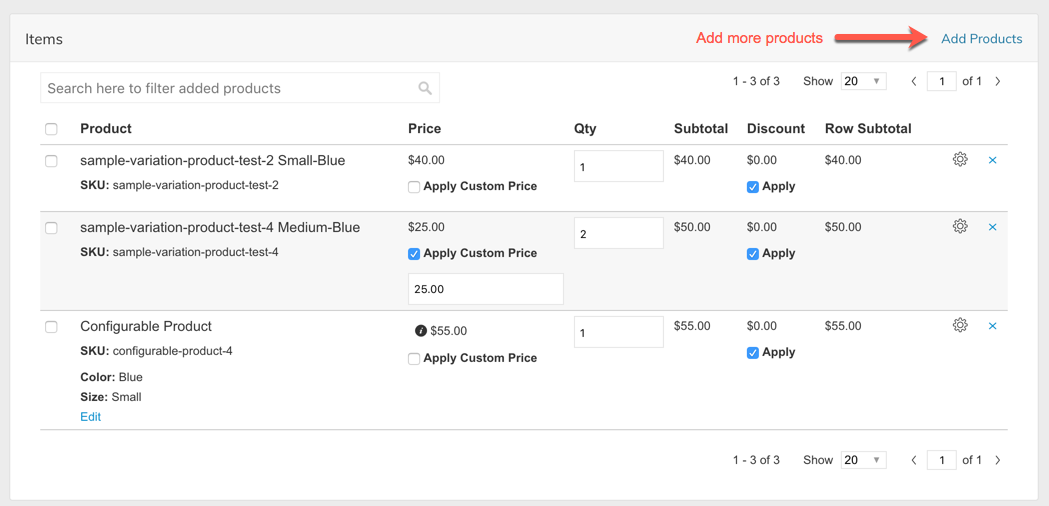
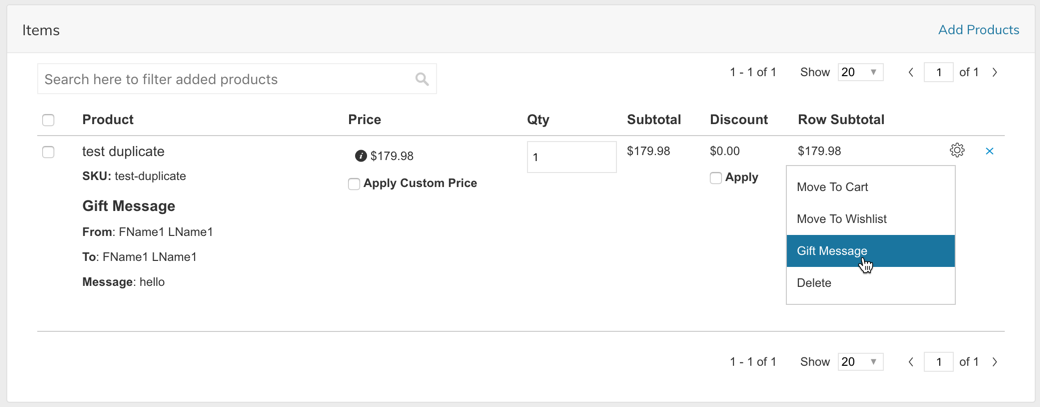
You can also Move To Cart, Move To Wishlist, or Remove the products from the order using the checkboxes and "Bulk Actions" or the Gear Icon on the far right of each item. If Gift Messaging for Individual Items is Enabled in Setup > Checkout Settings > Gift Messaging, the option to add a gift message will be available using the gear icon next to each item.
Product Prices & TaxProduct Prices will be shown here according to the configuration specified in Setup > Tax > Tax Settings
Step 5 - Billing & Shipping Address
The Billing & Shipping Address section allows the selection of existing addresses from the customer address book, editing of those addresses or adding new addresses.
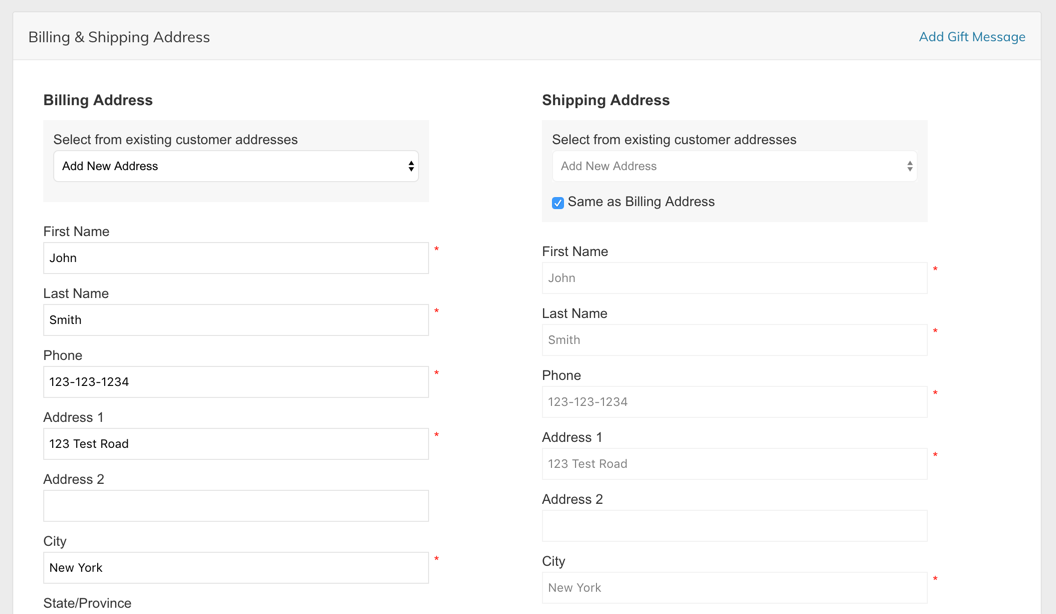
Change the Ship-To Location and Address on the OrderThe default Location will be used when creating an Order for an Account in the Admin. You must first change the Location to access other Ship To Addresses. Click here to learn how.
Step 6 - Shipping & Payment
Once the order has items and addresses you will be able to complete the Shipping & Payment for the order.
- Available shipping methods will automatically update as you make changes to the items and addresses on the order.
- Payment Methods will only be available after selecting a shipping method.
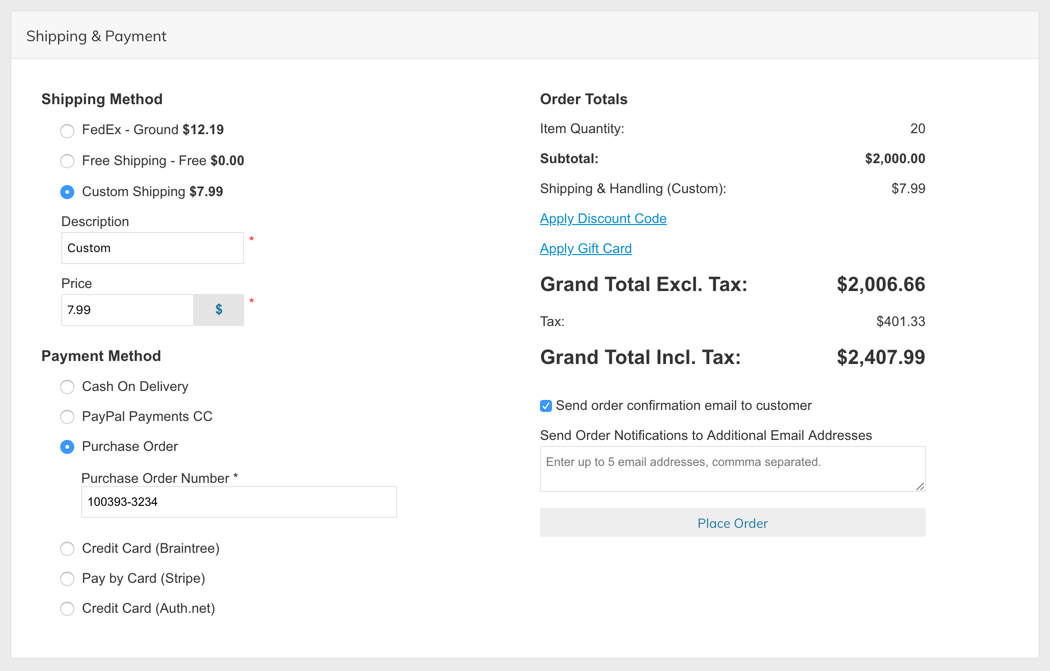
Once all required information, shipping, and payment methods are entered, the "Place Order" button will turn blue allowing you to submit the order.
Comments
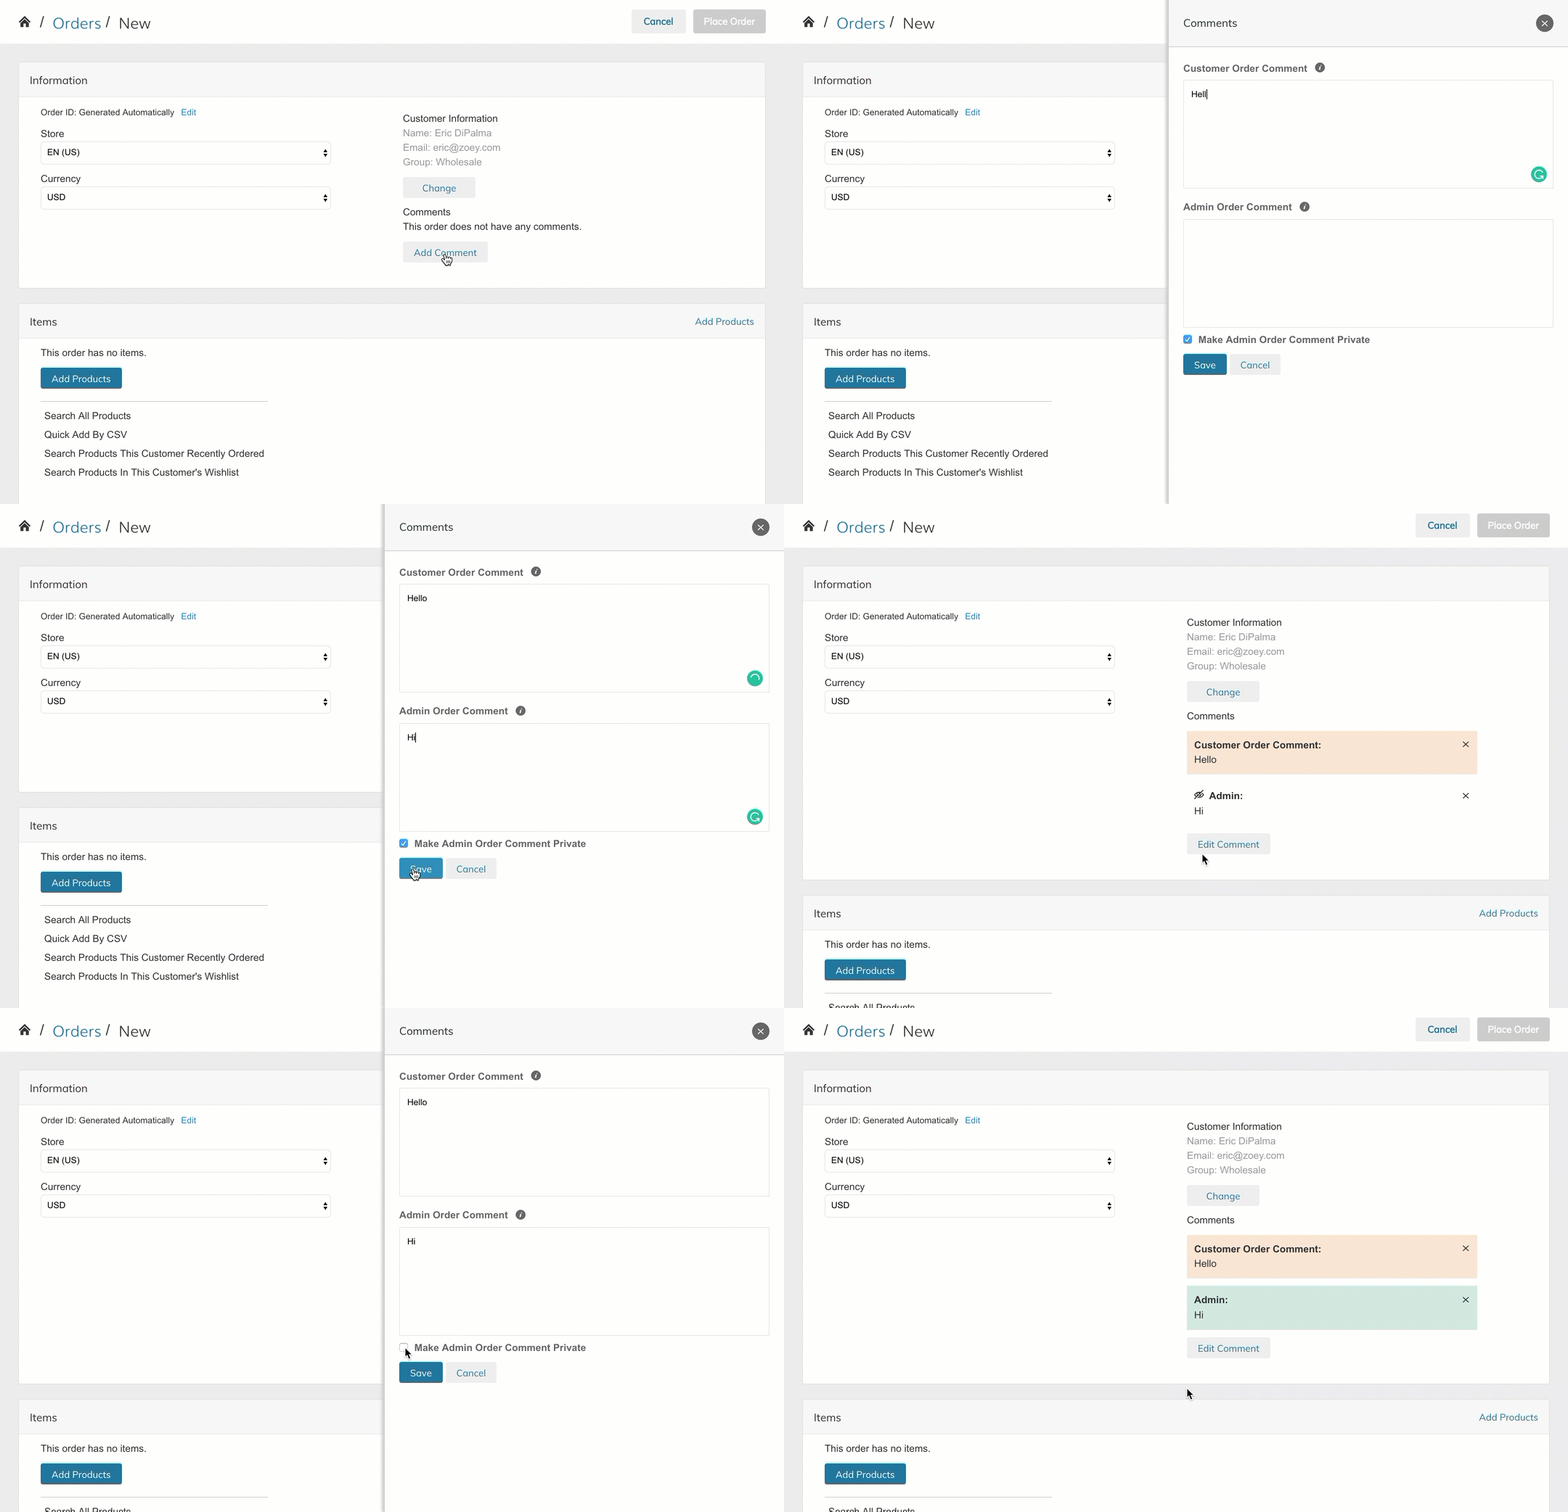
Within the Information Section of your New Order screen, you can click to add and edit Comments. This gives you access to:
- Customer Order Comments (Comments from the Customer)
- Admin Order Comments (Can be Public or Private - not visible to the customer)
Gift Messaging
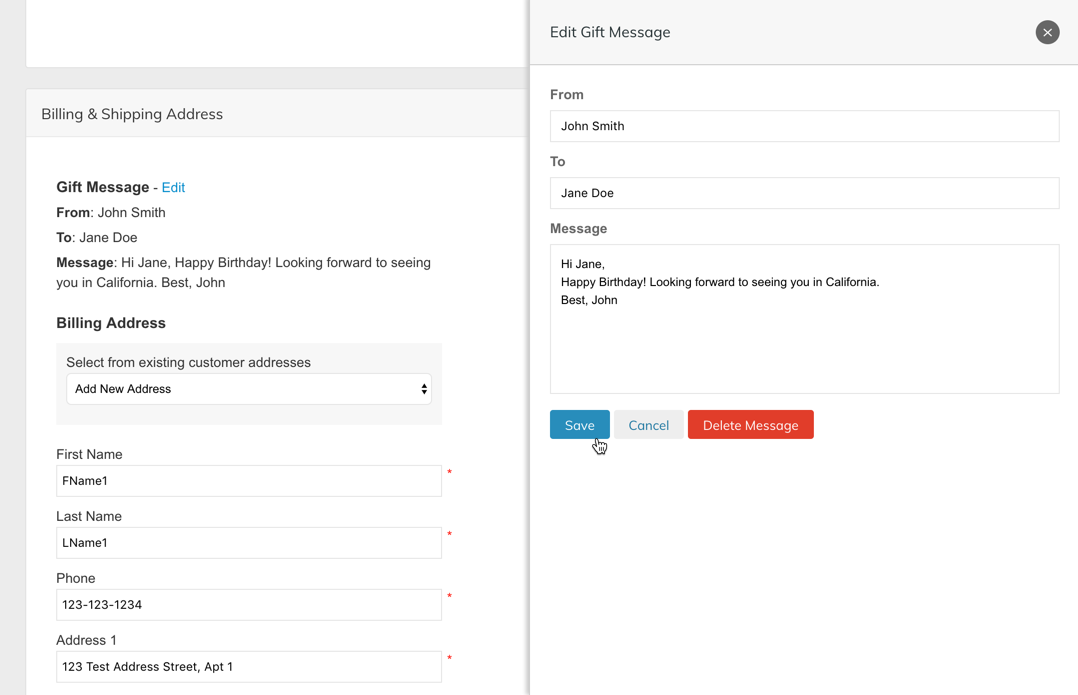
There are two types of gift messages that can be added to an order:
- Order Gift Message
- Item Gift Message
Enable Gift MessagingTo show in the Admin Order Create Screen, Gift Messaging must be enabled in Setup > Checkout Settings > Gift Messages
The Order Gift Message can be added by clicking the "Add Gift Message" in the Shipping & Billing Address section.
Item Gift Messages can be added by clicking the Gear icon next to the product in the Items section.
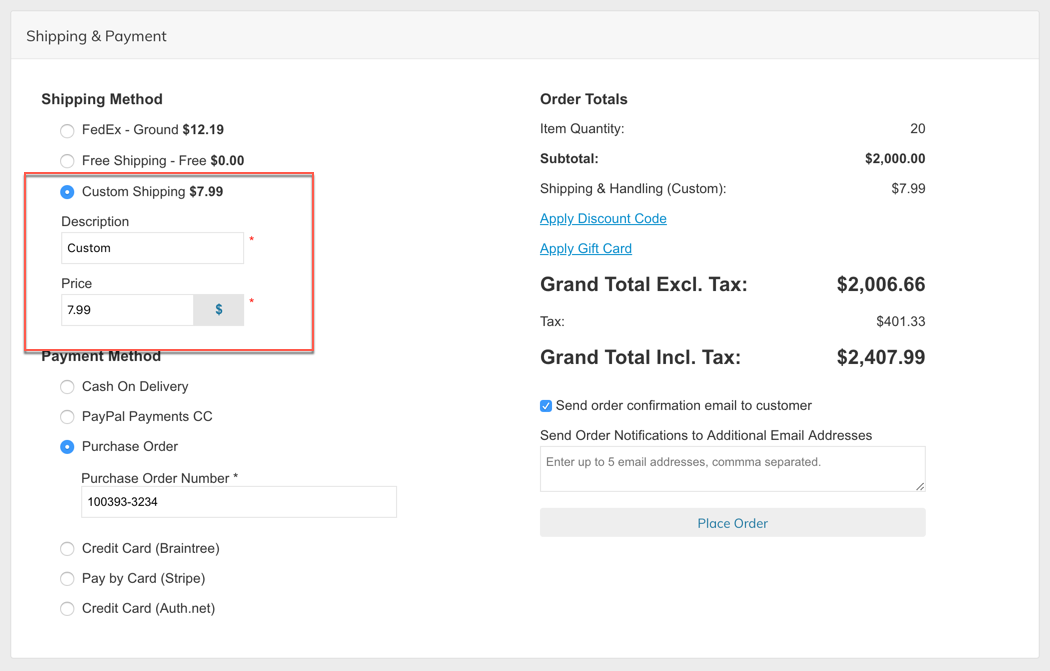
Custom Shipping Amount
In the Shipping & Payment section, there is a shipping method that allows a custom shipping amount to
Discounts & Gift Cards
In the Shipping & Payment section, you can click the buttons to add Discounts and Gift Cards
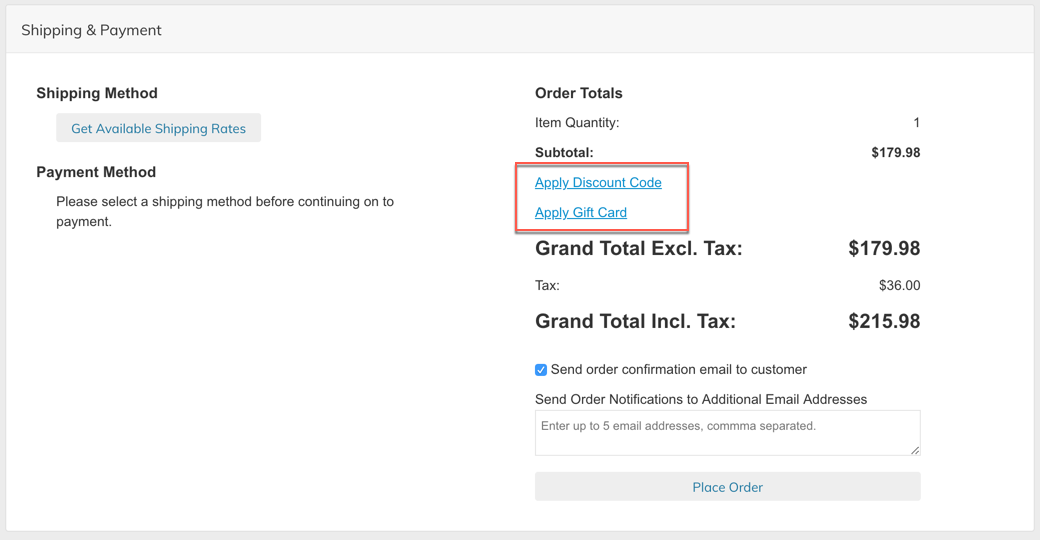
Discount (coupon) codes can be added into the "Drawer" that opens up when clicking "Apply Discount Code".
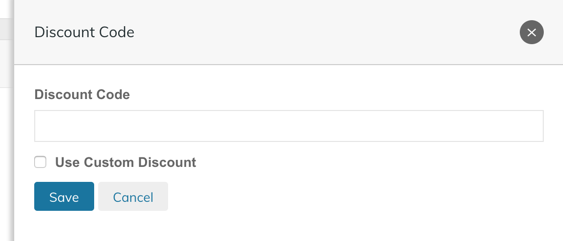
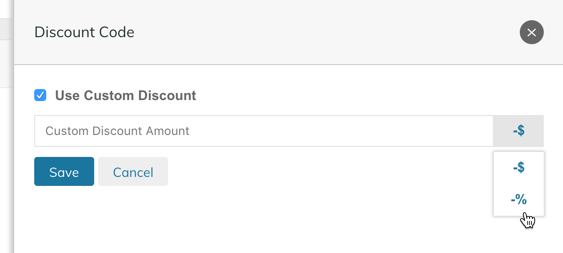
Custom Discount Amount
Within this same drawer, you will see a checkbox for "Use Custom Discount". Using this interface you can apply a custom discount amount as -$ or -% (see below)
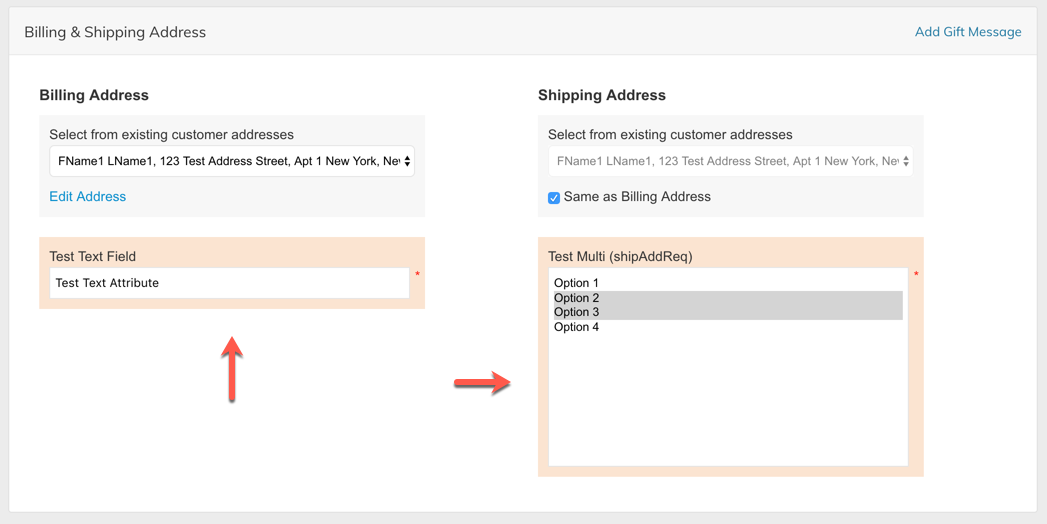
Order Attributes
Order Attributes will appear in the appropriate places in the Admin order Create screen. See below for examples of Order Attributes in the Billing Address, Shipping Address, Shipping Method and Payment Method sections.
Changing the Customer / Account Location on an Order
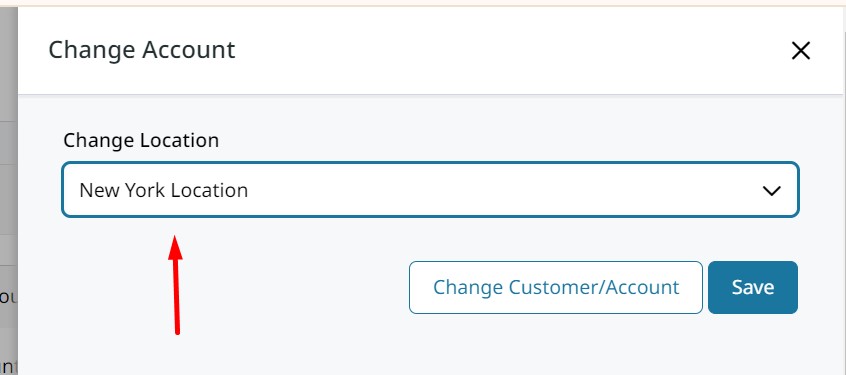
You must change the Order's Location to select other location's Ship To addresses.
In the top right of the Account Information section, click Change Customer / Account.
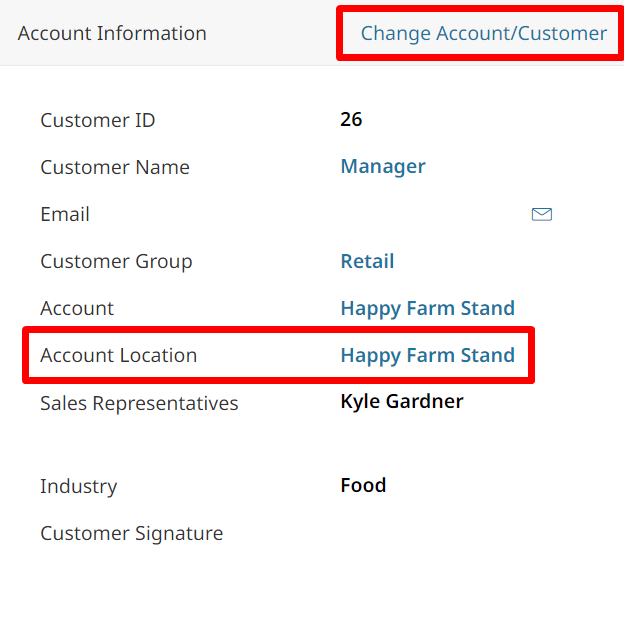
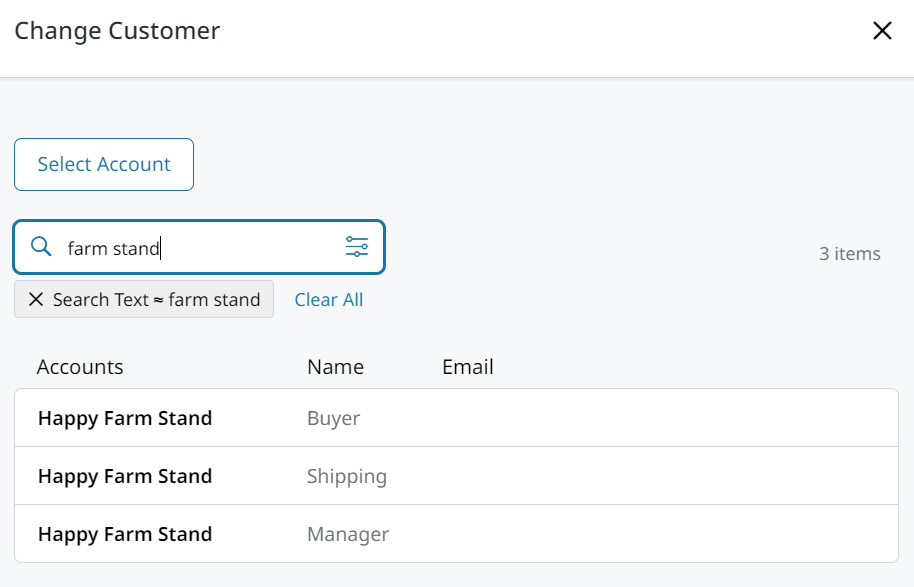
You can then search out a new Customer for this Order.
You are selecting a Customer to place the order on behalf of.If the same Customers can place orders for multiple Accounts, you will see those Accounts in the Select Account screen.
You can also select the Account Location that the order is being placed for. This will affect what shipping addresses are available for the Order.
Updated 10 months ago